5 Easy Steps To Turn Google Slides Into An Engaging Video
Easily turn your Google Slides presentations into an engaging, sharable video with Screencast-O-Matic. It only takes a few minutes to record your slides. You can add your voice narration and show your face via a webcam as part of your presentation.
You can also get really creative with your Google Slides videos by adding a green screen to remove your background. Enhance your slides even more by mixing and matching content from multiple devices. You can add stock photos or videos, or personalize it with music.
You won’t need any experience to get started. Just follow this guide to turn your Google Slides into a video in five easy steps.
Below is a quick video to show you how to turn your Google Slides presentations into a video:
1. Launch the Free Screen Recorder
Choosing the right software to record your Google Slides presentation is essential. We recommend our screen recorder because it’s intuitive, easy to use, and affordable on any budget.
The screen recorder is available on Windows, Mac, Chromebook, and Android or iOS mobile devices. Use it to create simple screen recordings or more elaborate videos.
Once your Google Slides presentation is ready to go, launch the screen recorder. If you have an account, you can simply head to your account page and click on the screen recording icon to get started.
If you don’t have a Screencast-O-Matic account, you can still access the recorder. We recommend having an account since it enables you to save and share your recordings from your hosting account.
2. Record your Google Slides presentation

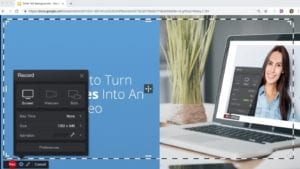
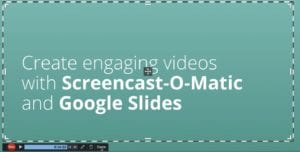
After launching the screen recorder, a transparent recorder box will appear on your screen. Drag and drop the sides of this box so that your Google Slides presentation fits inside. For best results, set the recorder size to 720p then size your Google Slides presentation to fit within that box. This preset size makes it easy to share your video with your audience.
In the bottom left corner, you’ll see all the controls you need to record your video:
- Select whether to record your screen, webcam, or both.
- See the maximum recording time available for your recording.
- In addition to click and drag, you can also choose a preset window size for your recording: 420p, 720p, or full screen. We recommend 720p for the clearest image of your Google Slides or PowerPoint presentation.
- Use the narration option to record presentation audio while you film. Click the arrow to select which microphone to use. Click “none” to disable narration.
When you’re happy with your recording settings, click “record.” You’ll see a quick countdown, after which you’re ready to film.
Don’t forget Green Screen: Green Screen is perfect for recording slideshows. It removes your webcam background, putting you directly in front of your slide deck. Enable Green Screen by clicking the magic wand icon, or find the effect in the Video Editor after you record.
3. Finish your recording

Done recording? When you’re happy with your audio and video, click the blue button to stop recording, and select “done” to save your project. If you need to delete your recording and restart, click the trash icon.

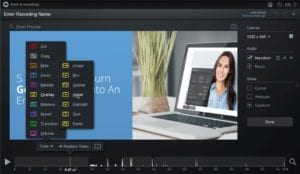
After clicking “done,” your recording will appear in a new window along with options to save and publish. If you’d like to go ahead and publish without editing your video, skip ahead to step five.
4. Add effects using the Video Editor

You have powerful editing options with both free and paid plans. As a free plan user, you can trim the start and end of your video to remove awkward pauses.
You can also add captions to your video to make it more accessible for hearing impaired students and those who use assistive technology.
Deluxe and Premier users can also use speech-to-text, type captions manually in the Interactive Captions Editor, or use the Scripted Recordings feature to use your captions as a script while you record.
If you really want to keep students engaged, you may wish to get a little creative with your editing. Deluxe and Premier users have access to an even wider range of handy video editing tools. Click “edit” to begin.
A menu will appear above your video timeline with the following tools and more:
Overlays: You can add images or additional video clips, blur out sensitive information, use an outline to emphasize certain points, add an arrow, provide additional text, or zoom/ highlight into a specific area of your recording.
Stock music: Access an expansive stock music library to fit any mood.
Transitions: For a professional look, add smooth transitions between each page of your slide deck. Screencast-O-Matic has dozens of transitions to choose from.
Narrate: If you forget to mention something or skipped over an important topic, you can use the narrate tool to record your voice narration over sections of your recording.
Green Screen: If you used a webcam in your recording, you could remove the background so you appear on the screen in front of your slides.
5. Publish and share your Google Slides video

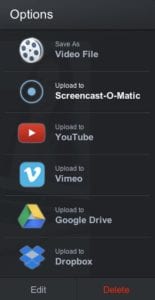
There are many options for you to upload, share and publish your videos.
Access one-click publishing for future recordings with a Screencast-O-Matic account. You can also publish directly on a YouTube channel, Google Drive folder, or save your video as a file.
Deluxe users can also publish to Vimeo and Dropbox.
Finally, quickly share your video directly to Facebook, Twitter, or your social media platform of choice with a URL.
Turn presentations into engaging videos
It’s so easy to record Google Slides and create an attention-grabbing presentation design with Screencast-O-Matic.
The videos you create will be more shareable and engaging than a regular slide deck. Best of all, with an arsenal of video lessons on your side, you can say goodbye to repeating yourself during class.
線上諮詢
與我們合作,馬上展開全新的創作里程碑
- 📅 立即預約,30 秒完成!
- 🎯 與創辦人 1 對 1 交流,獲得專屬建議! 🎯 與創辦人 1 對 1 交流!